Auto Import BAI2 files via SharePoint to D365 ABR
- mostphil11
- Sep 15, 2023
- 4 min read
The new 10.0.36 release of Microsoft Dynamics 365 introduces an out-of-the-box functionality for automating BAI2 files to further improve their advanced bank reconciliation feature. Learn more about this release, HERE. Enjoy the content and subscribe for more like it!
This blog provides a step-by-step guide for streamlining document management and bank statement reconciliation processes. It begins with configuring the SharePoint connection, creating document types, and setting up the BAI2 file format in Electronic reporting. It then details how to link the BAI2 format as a document source and ensure folder connections. The blog also guides readers through establishing a bank statement format and configuring the BAI2 file import batch job. Finally, it emphasizes the importance of validating system functionality through batch job history and file import status. It ultimately enables automated bank reconciliations with minimal manual intervention and ensures effective visibility into your company's bank account activity and balances on a daily basis.
1. Setup and configure SharePoint connection
Navigate to Organization administration > Document management > Document management parameters > SharePoint
If a "Default SharePoint server" does not auto-populate, paste your TENANTNAME.sharepoint.com link. This can be found in the SharePoint hyperlink, see below.

Paste that link in the field on the parameters page and click "Test SharePoint connection".

If you are unable to find your SharePoint or are having issues validating the connection, please reach out to your system administrator or IT support.
Once the connection is validated, click "Open SharePoint". This will bring you directly to where your D365 environment will be looking for files.
Create a new folder in SharePoint for incoming electronic files to be stored, example below.

2. Configure document types
Navigate to Organization administration> Document management > Document types
Create a new document type, one we can associate with an import file!

Find the recently created folder in the SharePoint Address, see below.

3. Setup BAI2 file format in Electronic reporting
Navigate to the Electronic Reporting workspace, and open the Microsoft repository (if it is not activated, go through the process of activating it).

Open the “Global configuration repository”

If prompted, connect to the RCS. Then import both "ABR BAI2 format" and "ABR Bank statement Mapping to destination"

4. Link BAI2 file format as a document source
Navigate to Organization administration > Electronic reporting > Electronic reporting source
Create a new electronic reporting source

Add a name, and a file name mask (optional), and change "Sort files before import" to Sort by Modified date/time
Define a file name mask, so that only files with the .txt extension are imported. The file name mask is optional and is used only when it has been defined. You can define only one mask for each ER format.

Click on "Settings"

We can also create a different folder in our SharePoint to house "imported", "warnings", and "failed" files. This feature will transfer them to the correct folder once an import is attempted.
5. Review file states to ensure connection to the folder
Drop a file in the "SP Main" linked folder in SharePoint.
Click "File states for the sources"

Refresh the page to validate that the folder is connected.
"Matched mask" should be checked, validating that only .txt files will be imported.

6. Setup a bank statement format in Cash and bank management
Navigate to Cash and bank management > Setup > Advanced bank reconciliation setup > Bank statement format
Create a new bank statement format
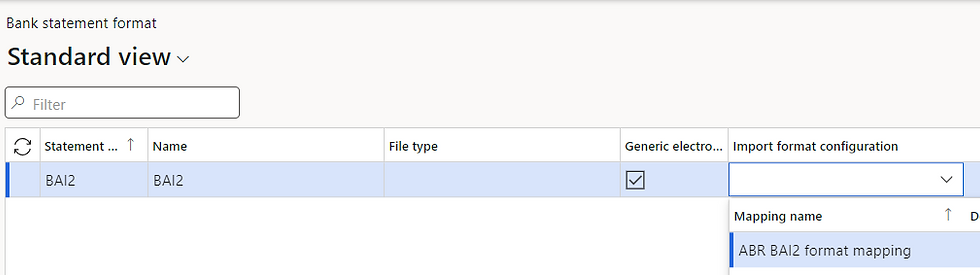
Assign this to the correct bank accounts after turning Advanced bank reconciliation

7. Setup the BAI2 file import batch job
Navigate to Cash and bank management > Bank statement reconciliation > Bank statements
Select "Import statement" in the header.
Once a statement format is selected, there will NOT be a file selection option. This is because we have already associated the electronic reporting format "BAI2" with the SharePoint import method.

8. Configure a recurring batch job to import the BAI2 file
In the pop-out screen, turn on "Batch processing" and define a recurrence.
For the purpose of this demo, I will set it to be every 5 minutes. So we can see the file import and open a bank statement reconciliation for our bank account.

The batch job has been added to our queue! Now we wait!

SUCCESS! Woohoo!

9. Validate all systems are a go!
Navigate to System administration > Inquiries > Batch jobs
Filter "Job description" by "Import bank statements", click into the JobID, then click on "Batch job history" in the header to see all the times it has run.

Here we can confirm that the batch job is running when scheduled. Now navigate to Organization administration > Electronic reporting > Electronic reporting source > File states for the sources
This page will define all imported files. We can validate that the file that was in our "File import source (Main)" SharePoint folder has been successfully imported and deleted. If we had created separate folders for files imported, warnings, and failed. We would see the file moved to the "imported" folder.

We will not see the file if we navigate to our SharePoint folder. It has been deleted to prevent any duplicate files from being imported, as seen in step 4.

Once the reconciliation rules and matching sets are configured and tested, the bank reconciliation will occur with minimal manual interventions! The next step is to communicate with the bank the location the BAI2 file is supposed to be dropped into on a daily basis.


Comments